HARDWARE
FIRMWARE
OPTIMIZATION
DSP ALGORITHMS
MANUFACTURING
I2S
MEMS
Emotiscope (2024)
A Music Visualizer From The Future - emotiscope.rocks
Table of Contents
- Hardware Design Overview
- Part Highlights
- LEDs Pretending To Be More
- The “God Damn Fast Transform”
- Live Tempo Synchronization
- The Remote Control
- Magic Touch
- Other Details

Hardware Design Overview
Stunning when you need it, invisible when you don’t
With a show that’s reactive to notation, vibrato, tempo, and more, Emotiscope uses a powerful dual-core microcontroller to produce very unique and pleasant-to-look-at light shows which synchronize to your music without any perceptible latency.
It features a magic black diffuser covering 128 of the world’s smallest addressable LEDs, which are being refreshed at 300-500 FPS. This combination produces a beautiful, analog appearance with a high dynamic range and apparent spatial resolution.
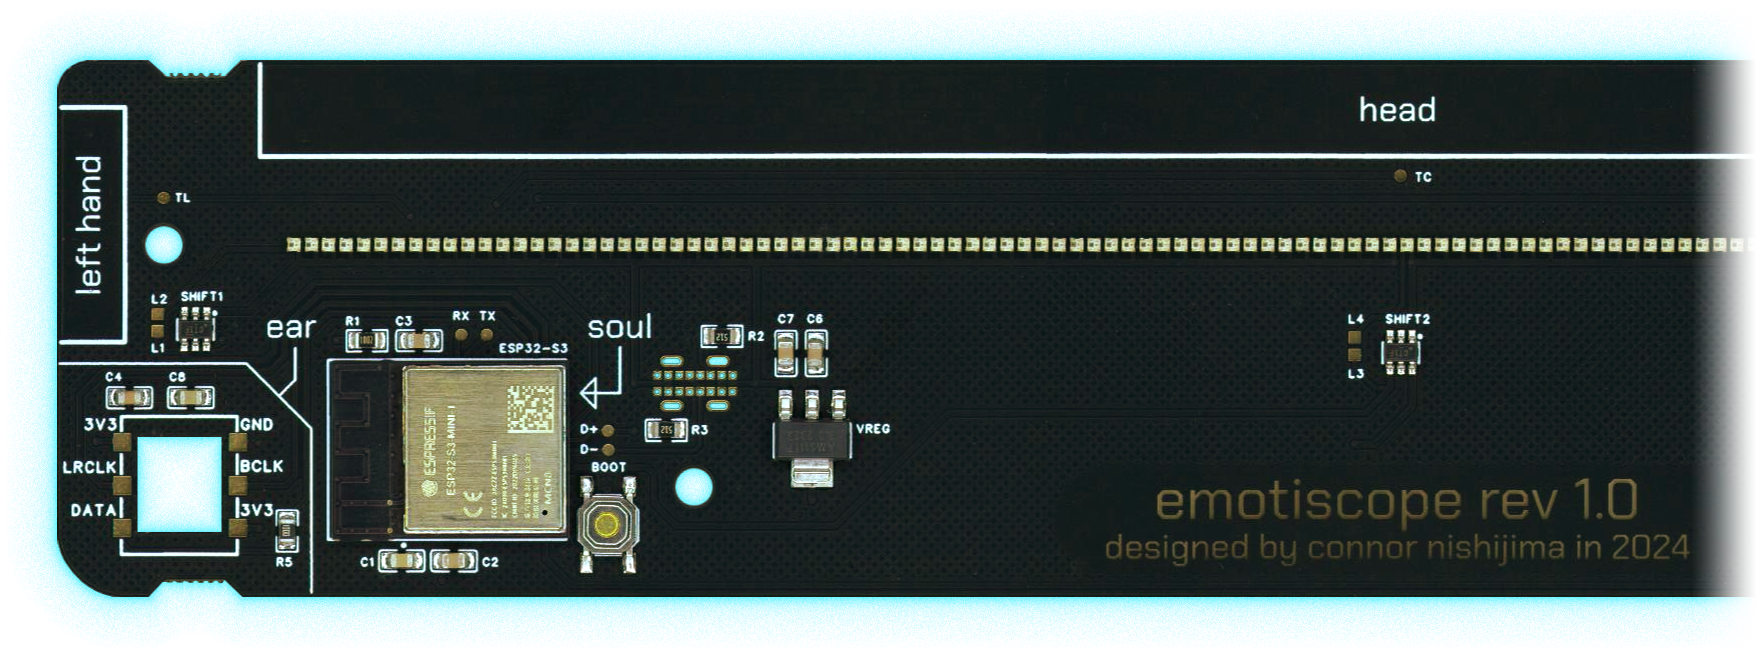
Part Highlights
Carefully combined components create complex curiosities
ESP32-S3 Microcontroller
- Dual-core 240 MHz (CPU and “GPU”)
- Emotiscope Engine FW built on new ESP-IDF 5.x
- Uses Espressif’s ESP-DSP library to perform SIMD operations on 32-bit floating point registers
- GPU / Core 0:
- Runs at a variable 300-500 FPS depending on shader complexity
- “Light Mode” Renderers (Shaders)
- Simulated Phosphor Decay
- Temporal Dithering
- Incandescent LUT
- RMT output to LEDs
- CPU / Core 1:
- Runs at a fixed 100 FPS
- IO/touch reading
- Audio acquisition
- Goertzel (160 instances)
- FFT
- Tempo/phase estimation
- WiFi
- Websockets
- HTTP
- Self Profiling
XL-1010RGBC (x128)
- World’s smallest 8-bit RGB Adressable LEDs (1mm x 1mm)
- Error diffusion algorithm for temporal dithering
- Approx. 11-bit range visible to eye after dither trick
SPH0645 MEMS Microphone
- I2S Bottom-firing Digital Microphone
- Sample Rate: 12,800Hz (Custom rate to process 128-sample frames at 100Hz)
- Mounted to custom daughter board to allow for replacement I2S microphones if needed
2300K LED Power Indicator
- Not yellow, but a calm, warm, incandescent-looking 2600K white
- Certainly not bright blue like a maniac
Laser-cut / 3D-printed Enclosure
- Faceplate laser-cut from a walnut or bamboo veneer
- Matte black rear acrylic plate
- Printed PLA feet with cork pads
LEDs Pretending To Be More
Your eyes can’t see the tricks, just the results
The RGB LEDs are 1.5mm apart and only 1mm in size. Even though these tiny LEDs already have a high pixel density, I also use subpixel rendering techniques that allow me to move (the apparent position of) dots on the screen less than 0.1mm at a time. The effect gives the illusion of a display with a spatial resolution >250 DPI while only having 16.93 DPI in reality. Paired with a uniquely high refresh rate (300-500 FPS) Emotiscope doesn’t look like a screen. It looks more like some kind of cathode ray tube from the far future or recent past depending on your settings.
Important to the illusion was the use of per-LED Temporal Dithering. These WS2812B-compatible LEDs only have 8-bits per color channel, which leads to awful banding artifacts at low brightnesses. However, they can be updated 500 times a second, which is much faster than your eyes can make out. By dithering the 8-bit color channels of each LED every few frames, your eyes are tricked into seeing a color depth of approximately 11-bits per channel. That’s 2048 brightness levels instead of just 256, which leads to darker possible colors and better gradients at low brightnesess.
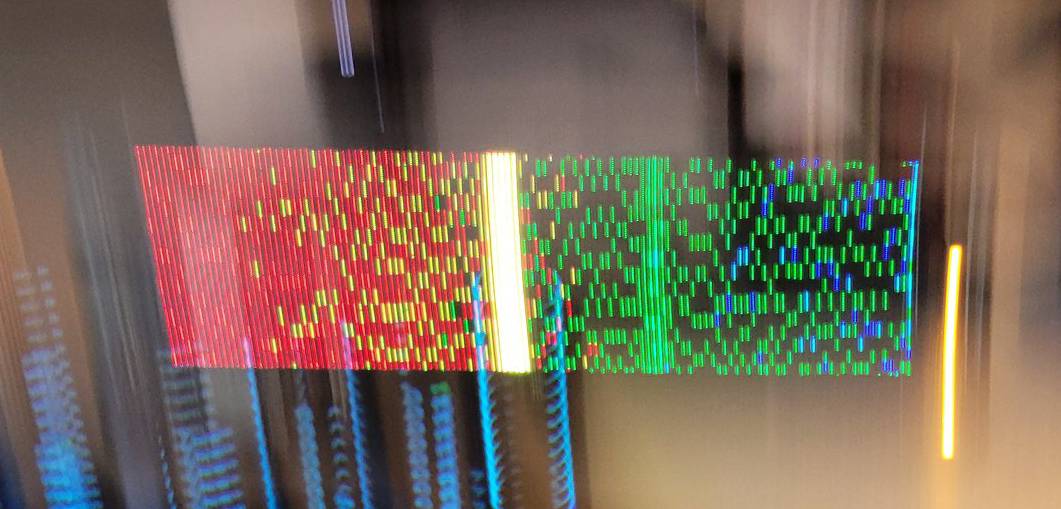
This is a photo demonstrating the temporal dithering in action. By taking a photo while flinging my phone through the air, I’ve effectively used the Y-axis of this photo to show the passage of time. When seen normally with your eyes, this appears as a smooth rainbow gradient from red to blue (with a spectral peak and a harmonic lit brightly in the center) at 1% brightness with no banding. You can see here how Emotiscope preserves color at low brightness with its limited LEDs.
Hardware brag: You’re seeing entire rendered + dithered frames drawn by the second ESP32-S3 core (and then transferred to the display) in about the same time my keyboard LEDs take to do a single PWM pulse in the picture above.
The “God Damn Fast Transform”
Actually, “GDFT” is what I call a Goertzel-based Discrete Fourier Transform.
Instead of an FFT where there’s N / 2 frequency bins spaced linearly on the scale, I’ve opted to calculate 64 bins of my own choosing, one at a time. This way, they can be allocated logarithmically to represent every note of the western musical scale between A2 (110Hz) and C8 (4186Hz). That’s the upper 64 keys of a grand piano!
I used The Goertzel Algorithm to quickly calculate each bin sequentially. This allows me to set custom window lengths (block sizes) for every bin to best balance them betweem time/frequency resolution and performance. Since Emotiscope is not a measurement tool, I was able to find compromises to the DSP code for the sake of speed without sacrificing the final look.
float calculate_magnitude_of_bin(uint16_t bin_number) {
    float magnitude, magnitude_squared, normalized_magnitude;
    float q1, q2;
    float window_pos = 0.0;

    // How many samples this specific bin needs (pre-calculated to balance time/freq resolution)
    const uint16_t block_size = frequencies_musical[bin_number].block_size;

    // Coefficients were pre-calculated
    const float coeff = frequencies_musical[bin_number].coeff;

    // Used to iterate through the Gaussian window LUT with substeps
    const float window_step = frequencies_musical[bin_number].window_step;

    // Input audio chunk
    float* sample_ptr = &sample_history[(SAMPLE_HISTORY_LENGTH - 1) - block_size];

    // Run Goertzel on this bin
    for ( uint16_t i = 0; i < block_size; i++ ) {
        // Apply window
        float windowed_sample = sample_ptr[i] * window_lookup[(uint32_t)window_pos];
        window_pos += window_step;

        // Perform Goertzel step
        float q0 = coeff * q1 - q2 + windowed_sample;
        q2 = q1;
        q1 = q0;
    }

    // Calculate magnitude, no phase
    magnitude_squared = (q1 * q1) + (q2 * q2) - q1 * q2 * coeff;
    magnitude = sqrtf(magnitude_squared);
    normalized_magnitude = magnitude_squared / (block_size / 2.0);

    return normalized_magnitude;
}
By having varying window lengths per bin, the highest notes can be detected with minimal sample data, and the lowest notes can still have good frequency-domain resolution with minimal latency.
Live Tempo Synchronization
Emotiscope knows how to “tap its foot” to the beat of your music
It’s not a simple problem to solve. We take for granted just how easily our brains are able to quickly identify and synchronize our movements to the tempo of a song. Here’s how I approached genre-agnostic tempo detection and synchronization by “DFT’ing the DFT”.
You can see the result of what I’m about to describe when Emotiscope is in Metronome Mode. The LEDs quickly synchronize themselves to the beat of a song, swaying patterns back and forth right on cue. It’s not only aware of what the current tempo (BPM, speed) of your music is, it also knows the magnitude of all common tempi at a given time and displays all predictions in parallel. For example, if the snare drum hits at 90 BPM but the hi-hat hits at 120 BPM, both patterns are detected and shown at the same time.
But how? By using 96 MORE instances of the Goertzel algorithm described above, for a total of 160 on every single audio frame. (160 x 100Hz)
First, a fourier transform is performed on time-domain audio with a sliding window of the last 1024 samples, which yields a 512-point spectral curve. Next, the spectral curve is modified so that only the positive changes in spectral power since the last frame are present (Note/beat onsets), before summing up all frequency bins into a single value: the “spectral flux” of the given audio frame.
(Hang in there, here’s the cool part.)
We now have a weird DC time-domain signal again where the amplitude is modulated by how much spectral change is occurring on each frame. Spectrally interesting “beats” like drums or rhythmic playing cause spikes, but sustained notes don’t affect the signal.
The final step is to run the 96 leftover instances of the Goertzel algorithm on this (much lower sample rate) signal again to detect the presence of different tempi in the currently playing music. Each Goertzel bin is tuned exactly for every tempo between 60 and 156 BPM, (60 BPM = 1.0Hz, 156 BPM = 2.6Hz) meaning the presence of music played at 80 BPM will cause a lone peak centered at the 80 BPM / 1.3333 Hz bin!
Now that Emotiscope knows the magnitude/presence of all tempi in your music, it has to synchronize animations to it as well. This means tracking not only the rate of beats, but their phase as well to make the metronome animation look correct.
Fortunately this is quite easy, since our DFT calculations from Goertzel also yield phase information that tells exactly where we are within in the time of one beat, returning one synchonized sine wave signal for every single tempi reading.
This method even works when two different songs are played over top of one another, since all possible tempi are tracked in parallel. I found that “DFTing the DFT” results in robust real-time tempo detection that’s genre agnostic and quick to react to changes.
Every single type of audio measurement Emotiscope can do is done on every single frame, regardless of what light mode is selected. So even when Metronome Mode isn’t shown, all of this tempo tracking is still being done in the background on the CPU core, along with the other 64 instances of Goertzel, a separate FFT, some autocorrelation, etc.. That way measurements like the spectrum / tempi / pitch detection are already accurate on the first frame from the GPU core if you switch modes.
The Remote Control
An app built by a hardware designer to be fun, responive, and ergonomic.
You don’t need an account, there’s no ads, there’s no subscription. You can save it to your homescreen via the browser’s menu and it’ll get an icon just like a “real” app. Low-latency communication happens over a WS connection, while the underlying HTML/JS is stored and served from Emotiscope’s filesystem. Remotiscope is also fully open source, and currently undergoing a port from raw HTML/JS to WASM via the Godot Engine.
Magic Touch
Anticipating interactions, just because!
Many of Emotiscope’s features are accesible without the app via touch on the top, left and right of the display. You can change modes with a tap on the top, hold to toggle Sleep Mode, or touch the sides to change color and toggle Mirror Mode.
Using intentionally oversized electrodes on the edges of the PCB, Emotiscope is not only sensitive to touch, but proximity as well! As your hand approaches a given side, the LEDs react proportionally to your distance. Upon contact, the visual feedback turns gold to confirm touches.
Other Details
Reversible Panels
A logo you can hide!
Beneath the display is a wooden panel of either Walnut or Bamboo, with the Emotiscope logo in the center. Both the wooden panel and the diffuser are reversible: The wood can be reversed to hide the logo, and the diffuser has either a matte side which is fingerprint resistant, or a classy gloss side with slightly higher contrast.
3D Printed Components
Smooth, glittery, strong
The plastic parts such as the feet and USB port cover are manufactured in-house with a Prusa Mini+ printer, in Galaxy Black PLA filament. They’re designed to print quickly and without supports. I use a smooth print bed so that the faces of Emotiscope’s feet are smooth to the touch.
A Cushion Of Cork
Thank me later
Beneath Emotiscope’s feet are laser-cut cork pads, which protect furniture from damage and provide a good grip on surfaces.